Setting up a k3s Kubernetes cluster on Proxmox virtual machines with MetalLB
What I do have is a machine in my closet running Proxmox VE, and there is absolutely no reason I cannot create a cluster using virtual machines within it. But I struggled to find a single guide that led me through this process in the way I wanted to do it. So here is that guide.

Why would I do this?
Learning Kubernetes has been on my list for awhile but the prices for managed clusters at the cloud providers are just too high for something I want to play around with infrequently. I love the idea of self-hosting my own resources, so I started looking into how to have my own cluster locally.
There are lots of guides on how to setup k3s (a slimmer Kubernetes distro) on raspberry pi's, but I unfortunately don't have enough laying around for this project. Also the pi has an ARM processor. That adds a new complexity to this process I do not want to get involved with yet.
What I do have is a machine in my closet running Proxmox VE, and there is absolutely no reason I cannot create a cluster using virtual machines within it. But I struggled to find a single guide that led me through this process in the way I wanted to do it.
So here is that guide.
Preface
This setup uses Proxmox VMs as opposed to LXC containers. You could probably make this work with LXC containers, but I have found that when using container tech, a VM works much more smoothly.
My server running Proxmox has the following specs:
- 64GB of RAM
- 8th gen core i7 4-core/8-thread processor
- 1 TB NVMe storage
I used Debian as my OS for my k3s nodes, but any linux OS should work. Many of the details I list in this guide assume Debian is the OS. You may need to change a few things.
You also need to install kubectl on your local machine. I do not describe how to do this here.
To install MetalLB I used helm. To do this you will need helm installed on your local machine.
Here we go...
Create a template VM
Create a new virtual machine and install favorite your version of Linux. For mine I used Debian 10.
Run apt-get update and apt-get upgrade to make sure it is fully up-to-date.
Create a user account for yourself and give it sudo permissions
# This assumes you are using a debian flavor of linux
adduser YOURNAME
usermod -aG sudo YOURNAME
Install any packages you want to be available on all nodes. You can install these later as well, but doing it now will make it easier on yourself. I recommend installing curl now.
Shutdown the VM.
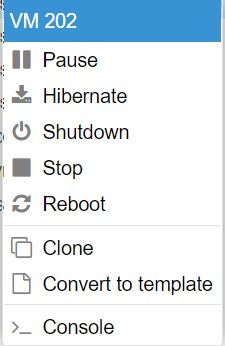
Right click on the VM and click convert to template and name it something like k3s-template.

Create the master node from the template
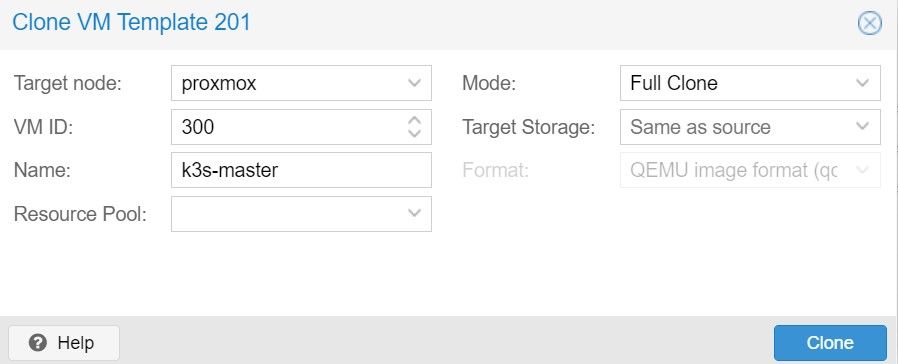
Right click the template and click clone. Set the name as something like k3s-master and set the Mode to full clone .

Once the clone is complete, start that new VM
Set a static IP
For this and all machines, a static IP needs to be set. Ideally this should be done with an address outside of your DHCP pool of addresses.
Edit your /etc/network/interfaces file. It should look initially something like this:
# This file describes the network interfaces available on your system
# and how to activate them. For more information, see interfaces(5).

source /etc/network/interfaces.d/*

# The loopback network interface
auto lo
iface lo inet loopback

# The primary network interface
allow-hotplug ens18
iface ens18 inet dhcp  # CHANGE THIS TO STATIC
You want to change it from dhcp to static on the last line and specify an appropriate address, netmask, gateway, and dns-nameservers for your network. My final version looked something like this:
# This file describes the network interfaces available on your system
# and how to activate them. For more information, see interfaces(5).

source /etc/network/interfaces.d/*

# The loopback network interface
auto lo
iface lo inet loopback

# The primary network interface
allow-hotplug ens18
iface ens18 inet static
        address 10.1.0.202
        netmask 255.255.0.0
        gateway 10.1.0.1
        dns-nameservers 10.1.0.3
Change the hostname of the system
Next change the hostname of the system to something unique. I used the naming scheme k3s-master and k3s-agent-1, k3s-agent-2... and so on.
You need to change the hostname in 2 different places.
Run this command to change the hostname:
# Run this on your master node
sudo hostnamectl set-hostname k3s-master

# If setting up a worker node you could do this
sudo hostnamectl set-hostname k3s-agent-1
Next edit the hostname in the /etc/hosts file
Change the line starting with 127.0.1.1 to your new hostname. Everything else you can leave alone.
127.0.0.1       localhost
127.0.1.1       k3s-master

# The following lines are desirable for IPv6 capable hosts
::1     localhost ip6-localhost ip6-loopback
ff02::1 ip6-allnodes
ff02::2 ip6-allrouters
Reboot
Now reboot the machine. Once its back on, make sure it has the correct hostname and has the correct static IP address you set.
Repeat for additional nodes
Repeat the above for all nodes you want to add to the cluster. Just make sure they all have unique IP addresses and unique hostnames.
You can name them anything you but, but make sure you at least know which one is your master node in the cluster.
On my cluster I created one master and two worker nodes.

Install k3s on the master node
This process should only be completed on the node designated to be the master node.
Connect to the master node via SSH or using the proxmox console and run the install script.
Important note: By default, k3s comes with a service called klipper-lb to handle load balancing. This will interfere with MetalLB and needs to be disabled for it to work correctly. The install command below disables klipper-lb.
curl -sfL https://get.k3s.io | sh -s - server --disable servicelbAfter the install completes you need three pieces of information.
- The static IP address of this master node
- The master node token generated during the install.
- The kubeconfig file located at
/etc/rancher/k3s/k3s.yaml. Download this to your local machine.
You can get the master node token by reading it from a file on the master node.
# This must be read with root permissions
sudo cat /var/lib/rancher/k3s/server/node-token
Install k3s on the worker nodes
On each worker node you need to run the install script with the two pieces of information above.
curl -sfL https://get.k3s.io | K3S_URL=https://$YOURIPADDRESS:6443 K3S_TOKEN=$YOURNODETOKEN sh -Connect to your new cluster
On your local machine set the KUBECONFIG environmental variable to the path of your k3s.yaml on linux you could do this:
export KUBECONFIG=/path/to/k3s.yamlNow you should be able to connect to and see your cluster nodes:
kubectl get nodes

## OUTPUT SHOULD LOOK SOMETHING LIKE
NAME          STATUS   ROLES                  AGE   VERSION
k3s-agent-2   Ready    <none>                 8d    v1.21.3+k3s1
k3s-agent-1   Ready    <none>                 16d   v1.21.3+k3s1
k3s-master    Ready    control-plane,master   16d   v1.21.3+k3s1
You now have a working Kubernetes cluster created with Proxmox VMs.
Installing MetalLB
Getting MetalLB up and running is extremely simply using helm. Note: You need helm installed on your local machine to do this.
MetalLB hands out IP addresses to your Kubernetes services. For it to do this safely, you need to designate a range of IP addresses that will not otherwise be utilized on your network. These should not be in the DHCP address pool and not assigned to anything else.
Create the following file values.yaml:
configInline:
  address-pools:
   - name: default
     protocol: layer2
     addresses:
     - 10.1.255.2-10.2.255.254
On the final line, specify the range of IP addresses you want MetalLB to hand out. In this example I set 10.1.255.2 through 10.2.255.254.
Now you can install MetalLB from the helm repo, and pass in this new file you created.
# Add the helm repo
helm repo add metallb https://metallb.github.io/metallb

# Install metallb
helm install metallb metallb/metallb -f values.yaml
Once all of the pods come online you should be able to create services of type: LoadBalancer and MetalLB will assign them an IP address from your pool.
Congratulations
Everything is complete. You can now experiment and learn Kubernetes locally without having to pay any cloud provider!
Links to other guides I found useful or used to help me


